Sugah's Place
Providing quality Sims 2 downloads, social discussions, group projects, original challenges & forum games in a friendly, fun atmosphere.
|
 Sugah's Place is proud to be one of the last remaining Sims sites devoted entirely to Sims 2. The Ladies of SP welcome you and thank you for being here with us. * See what's NEW by clicking on THIS LINK Sugah's Place is proud to be one of the last remaining Sims sites devoted entirely to Sims 2. The Ladies of SP welcome you and thank you for being here with us. * See what's NEW by clicking on THIS LINK ... We try to update regularly, so check back often! Follow us on Facebook, Pinterest and 'Tweet' yourself to a little Sugah!! ... Stop by, introduce yourself, play some forum games and schmooze a bit. We're happy to have you.  |
|
| | Gimp Photoskinning Tutorial by Caleb - Pic heavy |  |
| | | Author | Message |
|---|
Caleb_71
Age : 72
 |  Subject: Gimp Photoskinning Tutorial by Caleb - Pic heavy Subject: Gimp Photoskinning Tutorial by Caleb - Pic heavy  Sat Dec 17, 2011 6:28 am Sat Dec 17, 2011 6:28 am | |
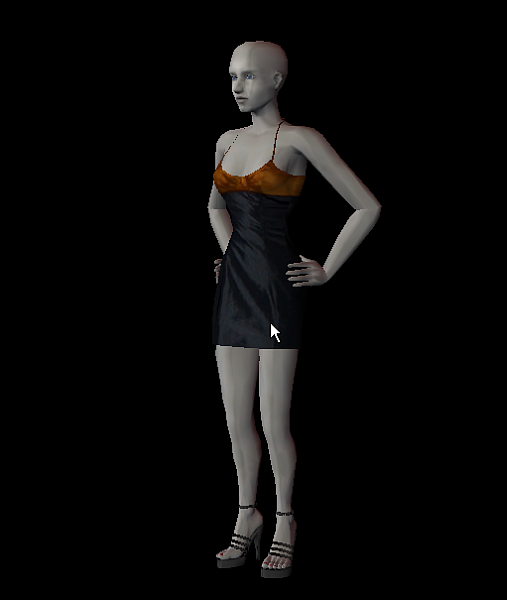
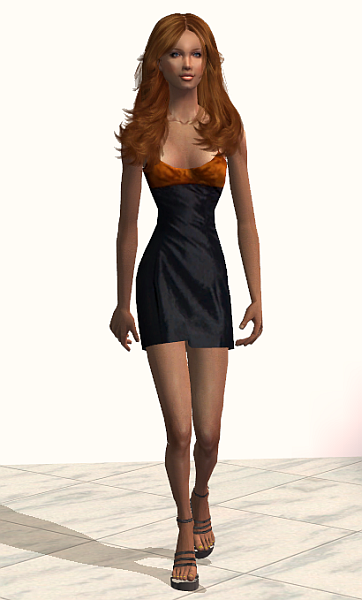
| This is a Tutorial starting at the deep end, but i will explain as I go, so that by the end you will have a recolour of my mesh for your game and maybe give you enough knowledge to attempt your own recolours of other meshes. I would recommend writing down or copying and pasteing into a Notepad File, where each function is in the Menus, so you don't have to go searching for them later on. If you use a program enough you will remember, until that time comes write them down. To start this Tutorial you will need a copy of Gimp, the Mesh as well at least one recolour from here, either the Maxis or Fashion Model mesh from that post will work for this, as both meshes can use the same textures. Install the mesh and at least one recolour, I will be using the Fashion Model shape. Open Body Shop, click 'Create Parts', click 'Start New Project', click 'Create Clothing',click 'Everyday', make sure 'Whole' is lit and find my recolour, click on it to show in the main window to the left. Now click the the Folder Icon at the bottom 'Export Selected Textures', give your Project a name, for me I will call it 'fm_dressheels4' (fm as I am using the Fashion Model shape, the underscore as Body Shop won't allow spaces, dressheels4 as that is my fourth recolour of this mesh) or dressheels4 if using the Maxi's version, click the tick to have that file created in Projects. Now you can minimize Body Shop as you will not need it for a while. You are going to need the following pic for this Tutorial so right click it and save it in 'My Pictures'. 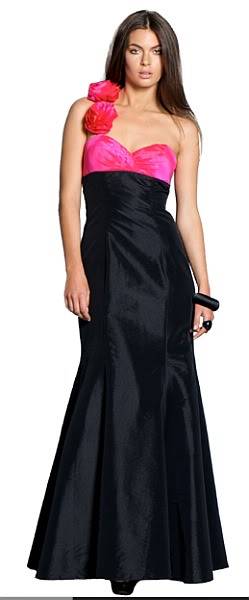 Go to my Pictures or where ever you saved the above pic, right click it and in the Menu that opens click 'Edit with Gimp'. Two windows will open up, one will be the toolbox and the other will contain the above pic. In the toolbox there are a number of icons, if you put your mouse icon over the first icon in the toolbox, it should have a description 'Rectangle Select Tool'click that icon and drag around the pink area. Try to get pretty close to what I have as in the following pic as we need to scale this crop up later and extra work could be involved otherwise: 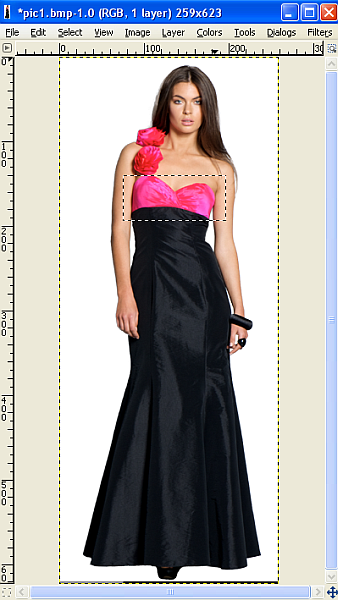 Now go up click 'Edit' and in the drop down Menu click copy, back up to file and click 'New', click 'OK' in the dialog box that opens. In the new window that opens click 'Edit', then in the drop down Menu click 'Paste". The pink area that you put the rectangle over should now be in the new Window. 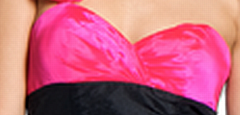 As there is already a pink version, we are going to do a different colour here, so go up to 'Colors' and in the drop down Menu click 'Colorize'. Now match the selection I have made in the following pic:  Back up to 'Colors' and in the drop down Menu click 'Color Balance'. In the 'Select to Range' click to adjust 'Midtones'. Now the selection I have made in the following pic:  Back up to 'Colors' and in the drop down Menu click 'Color Balance'. In the 'Select to Range' click to adjust 'Shadows'. Now the selection I have made in the following pic:  The top of the dress is not level, so hit the Shift+R keys and the Rotate Window will pop up, set this to -5.80 click 'Rotate' in the following pic: 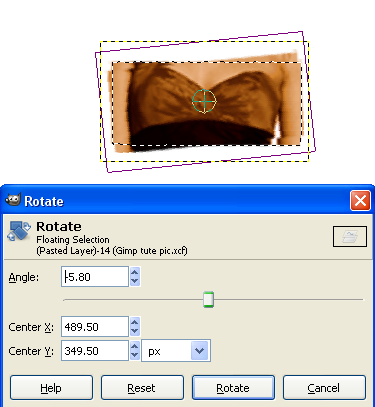 Now we go up to Image and in the drop down Menu click 'Scale Image', I went for a width of 980, your mileage may vary.  Time to get the texture pic we are going to recolour, so go to My Documents/EA Games/Sims 2/Projects and finally for me fm_dressheels4 or whatever name you called this Project, open that folder. The texture you want is body_alpha~stdMatBaseTextureName_alpha, but first copy and paste a copy to your Desktop. Why make a copy, just in case we make a mistake. Now right click that file and in the drop menu click 'Edit with Gimp'. 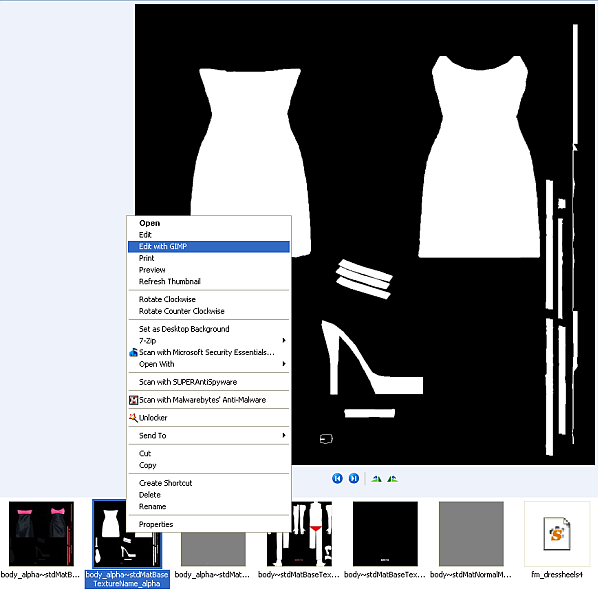 You thought we were going to retexture the coloured version, nope, it is easier to fill the white. You now have two Gimp files open, the texture that you just rotated, needs to be the selected Window to work on, it should still have a broken line around top of the dress, so go up to edit and click 'Copy'. Now on the other Window click 'New Layer', click OK on the Dialogue Window that comes up. Now across to the Toolbox and select 'Rectangle Select Tool' and drag a rectangle similar to the pic below. Why I use a layer, is to not damaged the original pic underneath. 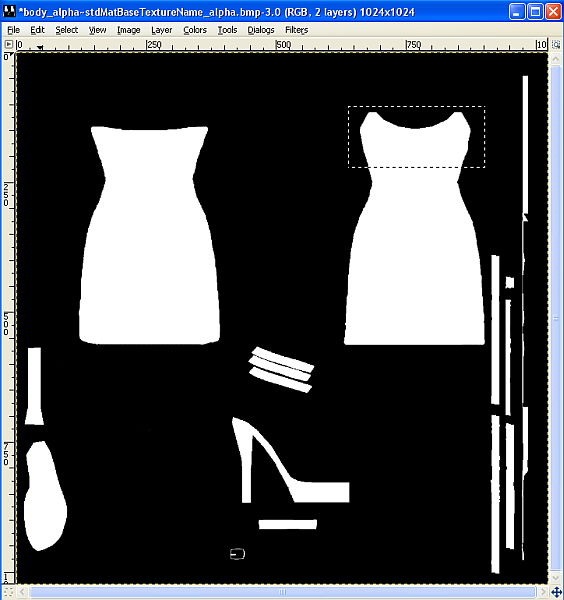 Go up to Edit and click 'Paste'. Now on your keyboard hit Ctrl and L to bring up the Layer Window. In the Layer Window, move the Opacity slider to 50%, the pasted pic and Layer Window on the pic below. 
Last edited by Caleb_71 on Sat Dec 17, 2011 6:53 am; edited 1 time in total | |
|   | | Caleb_71

Age : 72
 |  Subject: Re: Gimp Photoskinning Tutorial by Caleb - Pic heavy Subject: Re: Gimp Photoskinning Tutorial by Caleb - Pic heavy  Sat Dec 17, 2011 6:39 am Sat Dec 17, 2011 6:39 am | |
| GO up click 'View',in the Menu hover the mouse icon over 'Zoom', in the menu that opens click '2:1 (200%)'. Find the top of the dress, in the toolbox click on the blue cross with the arrow heads, called 'Move Tool'and position the pasted pic so it looks like the following pic:  Now if your texture looks close to mine, I did well when I gave you the Image Scale size. If it is to small with the white background showing on the outside of the breast area or to big that it dwarfs the white background, you will need to go back to the Image Scale part and alter the size either smaller or bigger depending on your result. The best way to go back is to up to Edit and reclicking the last action until you get to paste, with the pasted pic disappearing. Once you have a similar result to mine, we now go to the Toolbox and click the pinky red 'Eraser Tool', in the lower section of the Toolbox click on the black circle next to 'Brush", Click 'Circle 19'. Now start to erase the excess of the picture we don't need, leaving a pixel or two away from the white background, as well as removing most of the black below the curve, similar to the following pic: Important: Try not to let any of the under white colour show through, if you make a mistake just go up to Edit and click 'Undo' until your mistake is rectified. 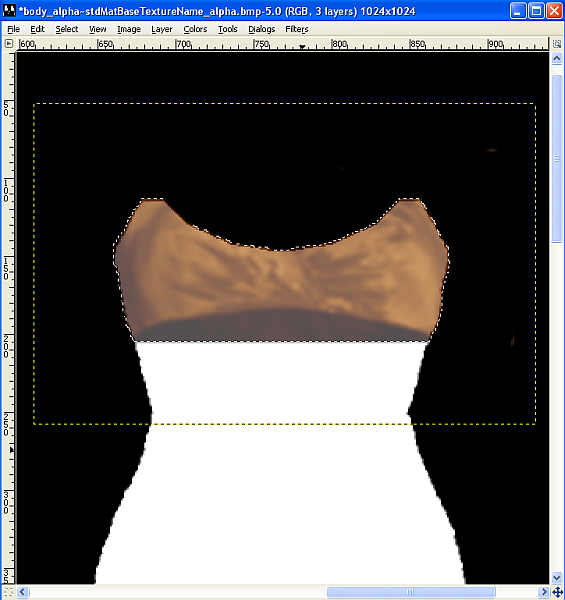 Go to your Layer Dialogue Window and set the Opacity level up to 100%, go to the Toolbox and click the 'Rectangle Selection Tool. Now click outside the rectangle that you pasted the pic into and the rectangle should disappear. Now click Layer and in the Menu click 'Merge Down'. Click Layer and in the menu click 'New Layer, click OK in the Dialogue Box. Back to the pic of the top of the dress and scale it up to 1170. Now click on Copy,  Copy the scaled up pic, go back to your Texture, create a new layer, drag a rectangle around the top of the other torso and paste the scaled pic. Now erase the bottom of the pic to remove the curved down edges:  Notice in the above pic at the bottom in the red sort of circle a double ended arrow, move your Mouse Cursor over the bottom of the window until you get the same, now left click and hold it, drag the bottom of the window up until you can just see the bottom dotted line: 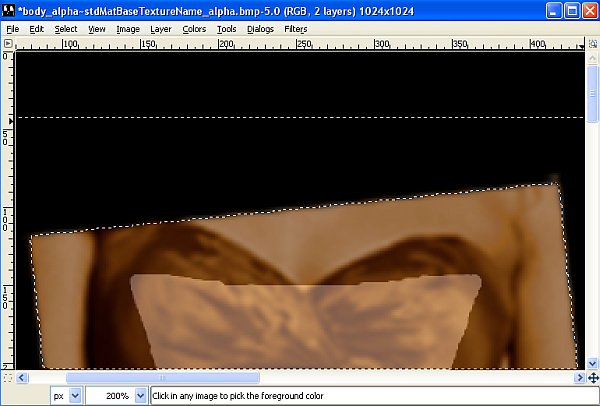 Now scroll across to the other top and check to see if there is some black just below the outer edges, as shown in following pic: 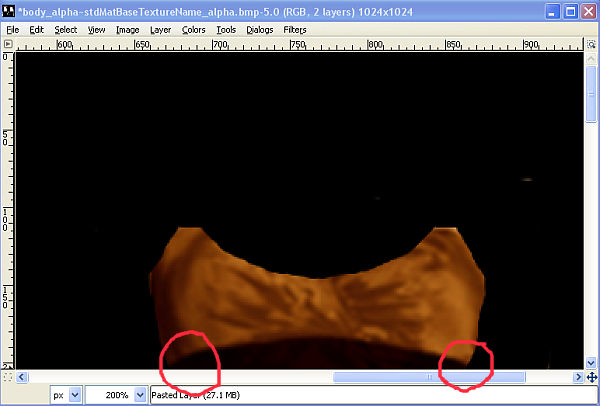 When you have a similar result, erase around leaving at least one or two pixels away from the white: 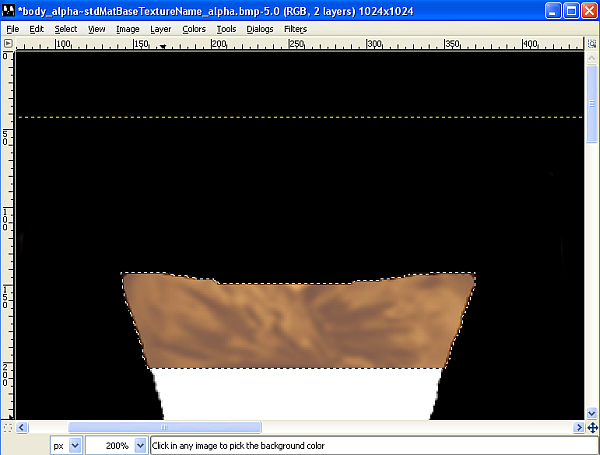 Now we are going to save this file as: body_alpha~stdMatBaseTextureName.bmp in Projects and what ever name you called your file, click File then in the drop down Menu 'Save As', a new window will open: 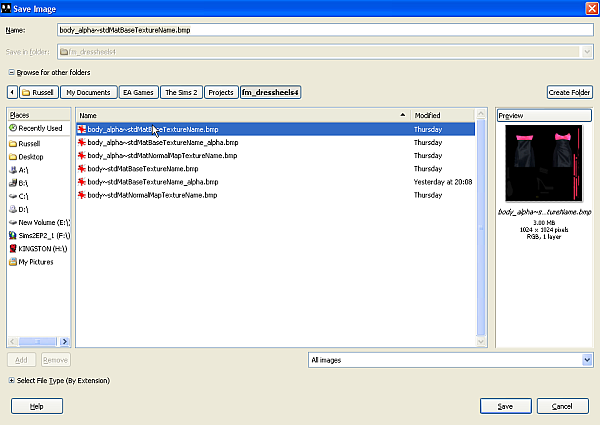 In the above pic make sure the Preview pic on the right is the original coloured texture and NOT the black and white pic we started with. Click Save, then Replace, then Export and finally Save. Bring Body Shop back and click the curved arrow called 'Refresh Preview Sim', hit the F9 and then the F8 keys, hold the left mouse button and turn the Sim around to see how close the line up of front to back is: 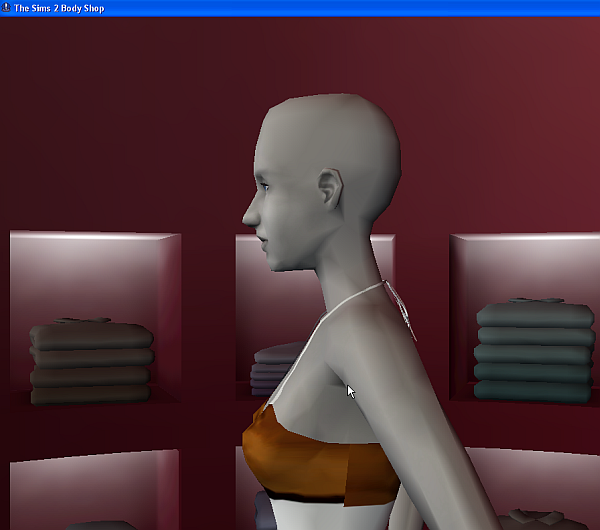 After going between Gimp to erase the bottom of the texture (please keep a straight line) and Body Shop to check the line up of front to back, hitting F9 to toggle screens to refresh, When you are happy minimize Body Shop: 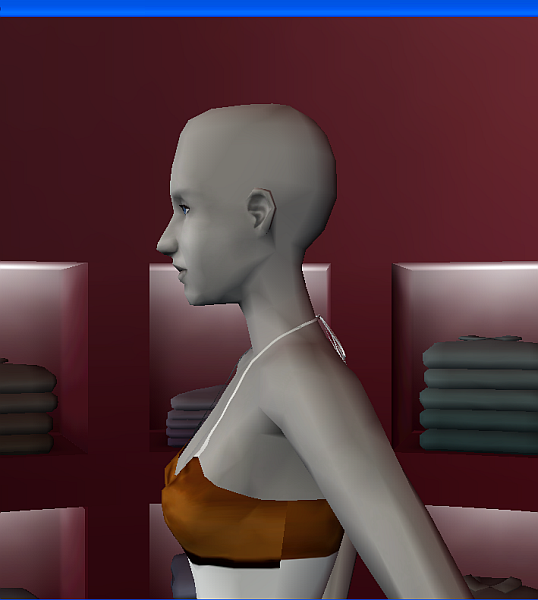 | |
|   | | Caleb_71

Age : 72
 |  Subject: Re: Gimp Photoskinning Tutorial by Caleb - Pic heavy Subject: Re: Gimp Photoskinning Tutorial by Caleb - Pic heavy  Sat Dec 17, 2011 6:52 am Sat Dec 17, 2011 6:52 am | |
| [center]Go to your Layer Dialogue Window and set the Opacity level up to 100%, go to the Toolbox and click the 'Rectangle Selection Tool. Now click outside the rectangle that you pasted the pic into and the rectangle should disappear. Now click Layer and in the Menu click 'Merge Down'. You can now close the small breast part of the dress, as that part of photoshopping is finished with. Now we are going to do the main part of the dress, so you need the original picture of the dress and scale it up to a width of 700. Now select a retangular area similar to below and Copy it: 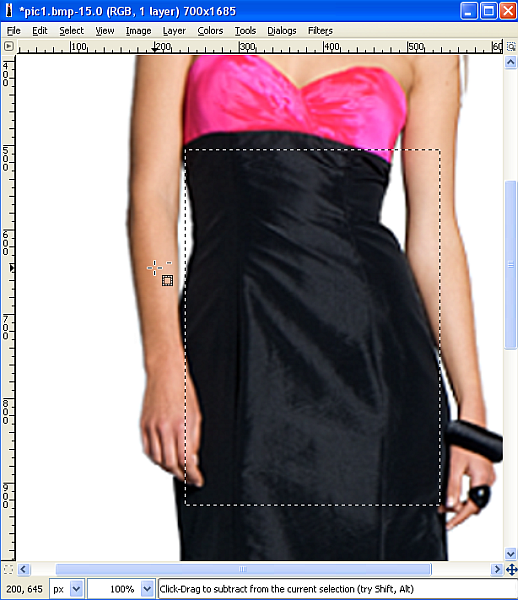 Back to our texture, under View drop the Zoom to 1:1 (100%), then add a Layer, drag a rectangle, hit Paste and position your paste similar to the pic: 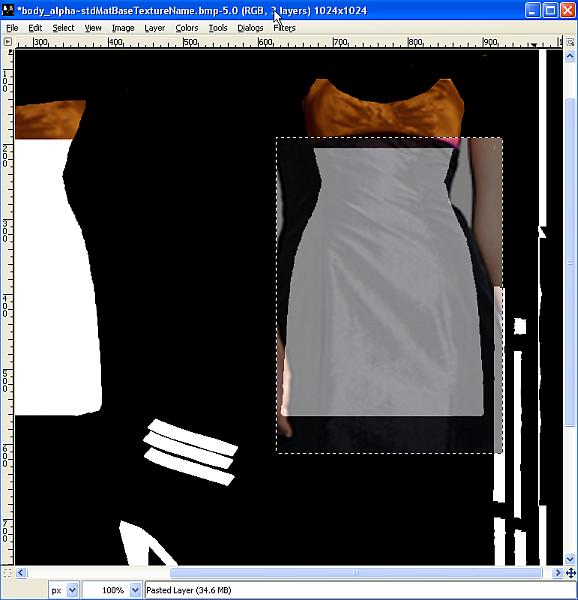 Drop the Opacity to 50% and Erase what is not needed. You may want to increase the Zoom to 1:2 (200%).My version: 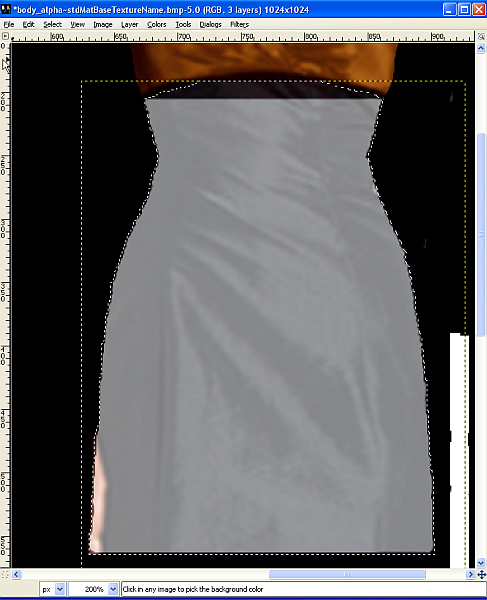 Once you are happy with the result,go to your Layer Dialogue Window and set the Opacity level up to 100%, go to the Toolbox and click the 'Rectangle Selection Tool. Now click outside the rectangle that you pasted the pic into and the rectangle should disappear. Now click Layer and in the Menu click 'Merge Down'. Back to the original picture of the dress and drag a rectangle similar to and copy it:  Back to our texture, under View drop the Zoom to 1:1 (100%), then add a Layer, drag a rectangle, hit Paste and position your paste similar to the pic: Important: You need to position the pasted pic so that it does not overlap the breast part or it will upset the line up of front to back. 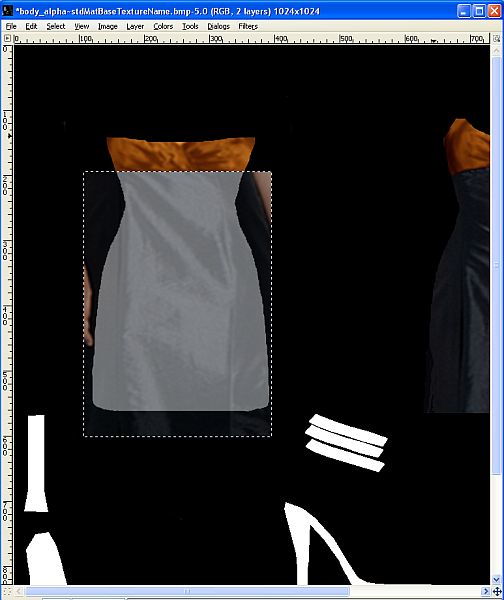 Drop the Opacity to 50% and Erase what is not needed. You may want to increase the Zoom to 1:2 (200%).My version: 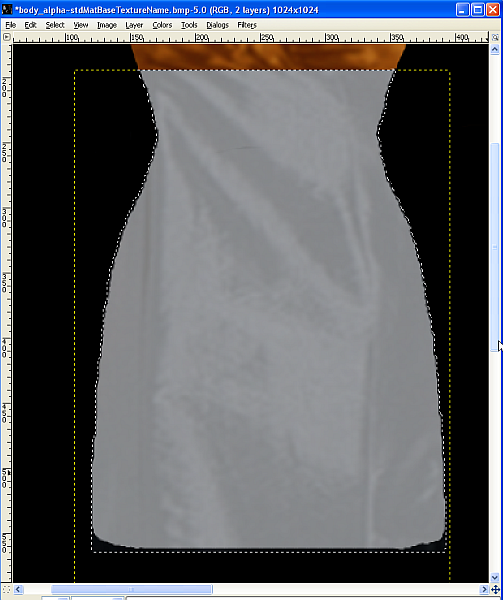 Once you are happy with the result,go to your Layer Dialogue Window and set the Opacity level up to 100%, go to the Toolbox and click the 'Rectangle Selection Tool. Now click outside the rectangle that you pasted the pic into and the rectangle should disappear. Now click Layer and in the Menu click 'Merge Down'. That is the photoshopping part done, you can close the original dress pic. To finish texturing the white areas left, it is just a matter of select and fill, so in the Toolbox select the wand with yellow tip, the Fuzzy Select Tool. While holding down the Shift key, click on the white area of the shoe parts. A broken line will be on the outer edge of the white. The black rectangle under the icons of the Toolbox is the Color Palette. So click it and select a colour, I am going with a dark grey:  Now you click OK in the Color Palette box, then select what looks like a tilted bucket 'Bucket Fill Tool', just click in each area you selected with the Fuzzy Select Tool and the selected area will fill with colour:  Now Zoom in to 4:1 (400%), scroll untill you see the buckle, use the Fuzzy Select Tool to select all of the rectangles, click the Color Palette, I am going with gold:  Select the 'Bucket Fill Tool' and click in the white to fill with colour. From the Toolbox select what looks like an eye dropper, the Color Picker Tool move your mouse over the brown breast area and click, this tool will match that colour in the Color Palette and display it in the coloured rectangle in the Toolbox. Select the Fuzzy Select Tool and while holding the Shift key, select the long straps on the right hand side of your texture, select the 'Bucket Fill Tool' and click the straps to fill with colour:  | |
|   | | Caleb_71

Age : 72
 |  Subject: Re: Gimp Photoskinning Tutorial by Caleb - Pic heavy Subject: Re: Gimp Photoskinning Tutorial by Caleb - Pic heavy  Sat Dec 17, 2011 7:13 am Sat Dec 17, 2011 7:13 am | |
| From the Toolbox select what looks like an eye dropper, the Color Picker Tool move your mouse over the area and click, this tool will match that colour in the Color Palette and display it in the coloured rectangle in the Toolbox. Use this method to select the colour to repair areas like this: There will be quite a few areas to repair asound the texture.  '' This an area that needs to be hand drawn, there are others, this is the finished pic. See if you can duplicate it:  When you are totally finished and happy save this file as: body_alpha~stdMatBaseTextureName.bmp  The texture loaded in to Body Shop.  What my finished texture looks like.  What this files should look like in your Projects Folder for this file.  When you are ready, Import to Game.  An in game pic.  This took a fair while and I actually did this recolour a few times during this Tutorial. Give this a try as I have learnt a lot in the shortish time I have used this Program and I am passing this knowledge on to others to take a giant leap forward in their endeavour to learn. Any questions just ask. This took a fair while and I actually did this recolour a few times during this Tutorial. Give this a try as I have learnt a lot in the shortish time I have used this Program and I am passing this knowledge on to others to take a giant leap forward in their endeavour to learn. Any questions just ask.
Last edited by Caleb_71 on Tue Dec 27, 2011 1:17 am; edited 1 time in total | |
|   | | twerplina
Age : 72
 |  Subject: Re: Gimp Photoskinning Tutorial by Caleb - Pic heavy Subject: Re: Gimp Photoskinning Tutorial by Caleb - Pic heavy  Sat Dec 17, 2011 2:27 pm Sat Dec 17, 2011 2:27 pm | |
| This is wonderful! I used to have Photoshop and Illustrator on my old system. (Although I didn't really know how to use them, I could get by in photoshop.) Now I have gimp and I do struggle with it. I also just started fiddling with meshes and textures, so the timing is perfect. I will definitely give this a try, which means I will be back with questions. I promise! Thanks again.  | |
|   | | ilikefishfood
Age : 59
 |  Subject: Re: Gimp Photoskinning Tutorial by Caleb - Pic heavy Subject: Re: Gimp Photoskinning Tutorial by Caleb - Pic heavy  Sun Dec 18, 2011 1:19 pm Sun Dec 18, 2011 1:19 pm | |
| Wow Russ...this is stellar! I've already got GIMP which I use for the most basic of things. I've never tried to recolour before...I'm a little nervous, but prepared to give it a whirl thanks to your very detailed tute. Will let you know how I fare! Thanks for your generosity! | |
|   | | Astral Faery

Age : 55
 |  Subject: Re: Gimp Photoskinning Tutorial by Caleb - Pic heavy Subject: Re: Gimp Photoskinning Tutorial by Caleb - Pic heavy  Sun Dec 18, 2011 3:50 pm Sun Dec 18, 2011 3:50 pm | |
| This is amazing, Russ. It truly is. You have put a lot of work into a very detailed tutorial with great pictures. Who knows - maybe someday I'll give it a try!  | |
|   | | AdriannaSimmie

Age : 50
 |  Subject: Re: Gimp Photoskinning Tutorial by Caleb - Pic heavy Subject: Re: Gimp Photoskinning Tutorial by Caleb - Pic heavy  Fri Dec 23, 2011 7:03 am Fri Dec 23, 2011 7:03 am | |
| Wow Russ!! thank you so much for your very easy to follow instructions using GIMP.
I know you put a lot of time and effort into this and I really appreciate it.
I use GIMP but admit I have been too afraid to try anything other than brushing up photos. I have to say your tutorial is the best one I have seen and I know that I might even be willing to attempt this in the future....
:TinyTree: | |
|   | | Sugah
Admin

Age : 65
 |  Subject: Re: Gimp Photoskinning Tutorial by Caleb - Pic heavy Subject: Re: Gimp Photoskinning Tutorial by Caleb - Pic heavy  Sun Jan 08, 2012 12:04 pm Sun Jan 08, 2012 12:04 pm | |
| Russ, please forgive my delay in responding to this detailed, easy to follow & comprehend tutorial. It is obvious how much time, effort and thought you put into these quality instructions. I agree with Toni & Jen. This tutorial IS stellar and one of the best I've seen.   I am most grateful that you offered this excellent tutorial at Sugah's Place. I hope it inspires others to give photoskinning a try.  | |
|   | | Sponsored content
 |  Subject: Re: Gimp Photoskinning Tutorial by Caleb - Pic heavy Subject: Re: Gimp Photoskinning Tutorial by Caleb - Pic heavy  | |
| |
|   | | | | Gimp Photoskinning Tutorial by Caleb - Pic heavy |  |
|
Similar topics |  |
|
| | Permissions in this forum: | You cannot reply to topics in this forum
| |
| |
| |
|

 Sugah's Place is proud to be one of the last remaining Sims sites devoted entirely to Sims 2. The Ladies of SP welcome you and thank you for being here with us. * See what's NEW by clicking on THIS LINK ...We try to update regularly, so check back often! Follow us on Facebook, Pinterest and 'Tweet' yourself to a little Sugah!! ... Stop by, introduce yourself, play some forum games and schmooze a bit. We're happy to have you.


 Sat Dec 17, 2011 6:28 am


 ''
''
