What You Will Need:
- SimPE
- CEP - Required for re-colouring Maxis objects
- Legacy Nvidia DDS Utilities - Download and install them, just like any Windows program, then start SimPE, select the menu 'Extra', 'Preferences' and fill in the field 'Nvidia DDS Tools' with the exact installation path (you can use the "Browse" button to find the folder where the DDS Utilities are installed).
- Gimp - Free image editor
- A seamless pattern. Find a list of sites here.
You can click on any image to show it fullsize at ImageShack.
First of all, open up SimPE and the Object Workshop. Click 'Open' to open up a cc file, or 'Start' to open up a Maxi's file. For this tutorial, I'll be re-colouring a Maxi's sofa:
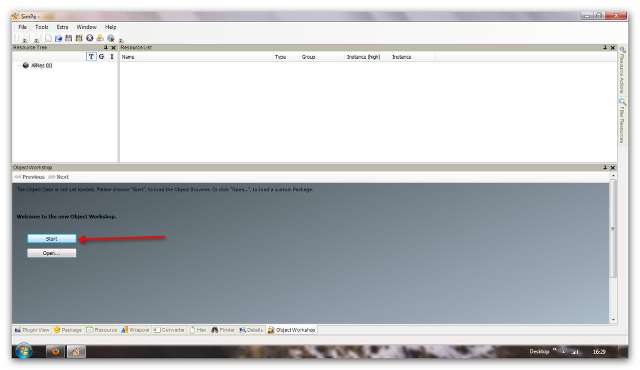
(Please note that the 'Object Workshop' may be in a different place, depending on how you have setup the layout of SimPE.)
Select 'Seating/Sofas/Lap of Luxury Sofa':

Click 'Next':

Select 'Recolor', then 'Start':

Make a new folder on your desktop, or somewhere easy to find. Inside that folder, save the file as something easily identifiable, for others and yourself:

Select any fabric from the top part of the window and click 'OK':

Export the image to the same folder you just created:

Start up Gimp and open up the image you exported:

Open up your seamless image. I usually scale them to a width of around 256 or 128, but it can be any size you want, depending on the look you are going for:

Select the image:

Copy the image to your clipboard:

Using the rectangular select tool, select the parts of the image you want to fill with your pattern:

Select the pattern fill tool:

The clipboard selection is at the top-right of the pattern box:

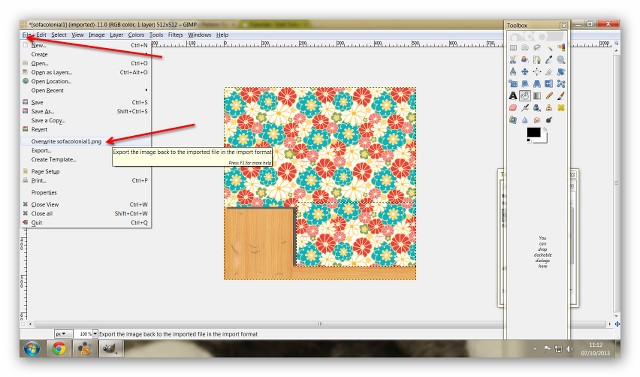
Click the selected part of the image to fill it, and repeat the process for each part of the image you want to recolour with the pattern. You can also recolour the wood parts the same way. Then select the 'File' and overwrite option to save the new image:
Go back to SimPE, and right-click on the texture image. Select 'Build DXT':

If that option doesn't show, you need to check your DDS installation as you can find at the top of this tutorial. Open the image you saved, and click 'Build':

Click 'Commit' then 'OK':

Save the file, then save it to your Sims 2 downloads folder:

Now fire up your game to see what it looks like:

Simple, wasn't it? :) Once you get used to the process, you can knock out dozens of re-colours without breaking a sweat! Try it, you won't regret it!
Just a word about adding shadows - if you are familiar with using layers in your image editor, you could add a new one to add some shading, creases and shadows to make your re-colour a little more realistic.
 Sugah's Place is proud to be one of the last remaining Sims sites devoted entirely to Sims 2. The Ladies of SP welcome you and thank you for being here with us. * See what's NEW by clicking on THIS LINK ...We try to update regularly, so check back often! Follow us on Facebook, Pinterest and 'Tweet' yourself to a little Sugah!! ... Stop by, introduce yourself, play some forum games and schmooze a bit. We're happy to have you.


 Fri Aug 15, 2014 2:33 am